Google Sheets – SUM or COUNT Values If Cells Have Notes

Overview

If you’re using Google Sheets and you have a list of amounts that you want to sum or count based on whether or not there are notes in the cells, there’s no built-in function to do it. However, there are a relatively easy set of steps to make your own functions to get it done. You’ll be able to COUNT based on cell notes and you’ll be able to SUM as well. Previously, we’ve made custom functions to COUNT or SUM by background color.

This video will walk you through the same steps described below.

Custom formulas in action

COUNT or SUM by note
Cells being counted and summed by notes

SUM if there are notes

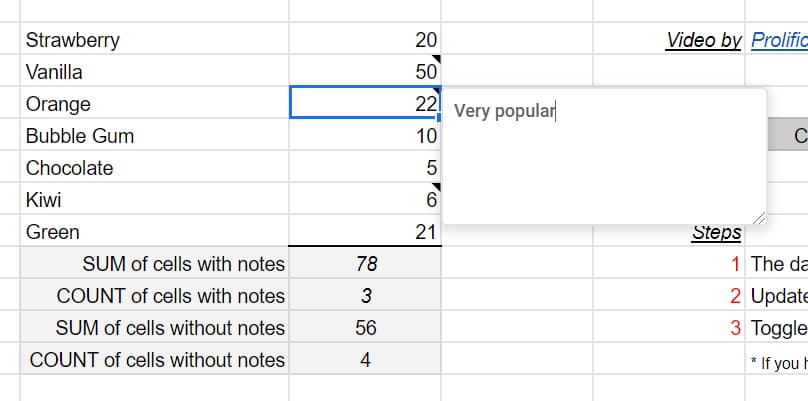
If you look in the live spreadsheet, you will see the custom formulas being used for summing based on whether a cell has notes. This does not work for comments, only notes. The summing is done by a formula with the nice little name of SumIfNote which takes the inputs of your range, TRUE/FALSE for with/without notes, and a trigger to recalculate as explained in the associated video.

formula for SumIfNote
Formula used to sum if there are notes

COUNT if there are notes

CountIfNote returns a 3 (which you can see above) since there are three cells with notes.

CountIfNote Formula
Formula to count cells if they contain notes
Watch the video

Creating custom formulas

It is far easier to grab a copy of the linked sheet. How do we make these functions and any other custom function that you’re so inclined to write? First, go to Tools and you go to Script editor.. and to copy and paste code below.

 /**
* @param {range} countRange Range to be evaluated
* @param {range} colorRef Cell with background color to be searched for in countRange
* @return {number}
* @customfunction
*/

function SumIfNote(sumRange, note, refresh) {
  var ss=SpreadsheetApp.getActive();
  var aSheet= ss.getActiveSheet();
  var sRange = aSheet.getRange(sumRange);
  var values = sRange.getValues();
  var sumResult=0;
  var rangeRow = sRange.getRow();
  var rangeColumn = sRange.getColumn();
  for(i=rangeRow; i<rangeRow+sRange.getNumRows(); i++) {
    for(j=rangeColumn; j<rangeColumn+sRange.getNumColumns(); j++) {
      if((aSheet.getRange(i, j, 1, 1).getNote() != "") == note) {
        sumResult += values[i-rangeRow][j-rangeColumn];
      }
    }
  }
  return sumResult;
}

function CountIfNote(sumRange, note, refresh) {
  var ss=SpreadsheetApp.getActive();
  var aSheet= ss.getActiveSheet();
  var sRange = aSheet.getRange(sumRange);
  var values = sRange.getValues();
  var countResult=0;
  var rangeRow = sRange.getRow();
  var rangeColumn = sRange.getColumn();
  for(i=rangeRow; i<rangeRow+sRange.getNumRows(); i++) {
    for(j=rangeColumn; j<rangeColumn+sRange.getNumColumns(); j++) {
      if((aSheet.getRange(i, j, 1, 1).getNote() != "") == note) {
        countResult += 1;
      }
    }
  }
  return countResult;
}

Script editor

After you go to Tools then Script editor, you come up with a blank screen. But if you don’t, do a new script file. Paste the code into the blank window. Repeat for each code section above and name them countColoredCells and sumColoredCells. For each file, the script editor puts the “.gs” at the end of the file name, indicating that it is a Google Script. After making these two, save them, return to your spreadsheet, and type in the formulas. It should work for you. See the video and linked sheet for further clarification.

 Live examples in Sheets

Go to the linked sheet for examples of counting cells by notes that you can study and use anywhere you would like.

keep in gmail

Add an Email from Gmail into Google Keep – No Extensions

If you have a Gmail email and like to take notes in Google Keep, there have probably been times where you would like to add an email to Google Keep so that you can refer to it later. There’s a way to do this now without extensions or plugins, in just a few easy steps.

First, go to your Gmail and find the email that you’d like to store in Google Keep, and open it. On the far right-hand side of the screen you’ll find a panel with a Google Keep icon. Left-click on this icon to open Google Keep.

keep in gmail

With Google Keep open, you’ll find on the far right at the top there’s a button with a yellow plus sign which gives you the option to create a new note. Left-click on this button to create a new note for the email.

take note in keep

This brings up a window where we can add a title and text to the note. You’ll see that the note already contains a link to the email.

email link note

Add a description to the note, in this example we’ll clarify that it’s an email about time management software. Then click ‘Done’ to add the note to Google Keep.

keep note description


Now, let’s go to Google Keep. Our note is here!

note in keep

We might want to color all our Gmail notes the same color to make them easier to spot. Click the Color palette icon at the bottom of the note and select a color for this note. We’ll make it red.

keep note color

We can click on the link inside the note to bring up the email in Gmail.

keep note link email

It’s important to remember not to delete the email, as our note does not make a copy of anything – it just acts as a link-back to the original email. However, you can archive the email in Gmail to get it out of your inbox, and the link will still work fine.

gmail archive email

You can also have Google Keep remind you about the email later, for example next week. Left-click the Reminder icon at the bottom of the note in Google Keep, and select when you would like to be reminded.

keep note reminder

You can then archive the note in Google Keep as well so it doesn’t clutter the page, and you’ll still get a reminder notification, so you can deal with it at the right time. To do this, left-click the Archive icon at the bottom of the note.

archive note keep

That’s it! We’ve added our email to Google Keep. The email is archived (out of our Gmail inbox), the Google Keep note is archived (out of our Google Keep home page) and we’ll be getting a reminder about the email next week.

Hope this tutorial has been useful for you and your business!

Tutorial Video