Collect Data into Google Sheets | Forms, Quizzes, Surveys

By effectively utilizing Google Forms, you can sort, manipulate, and track a detailed database of information gathered from a number of sources. This tutorial will show you how to create a Google Form, how to send it to as many people as you would like, and how to manipulate the data afterward in Google Sheets. This tutorial is also in a video on YouTube.

Creating the Form

Begin by opening the main dashboard of Google Drive, and by clicking the “new” button and selecting “Form.” You can also right-click the dashboard, navigate the cursor to “More,” and create a new form.

create a new form

The form menu will appear, and you can begin filling in the questions you would like to be answered. Add a title to your form, then fill in the questions below.

Give your form a title

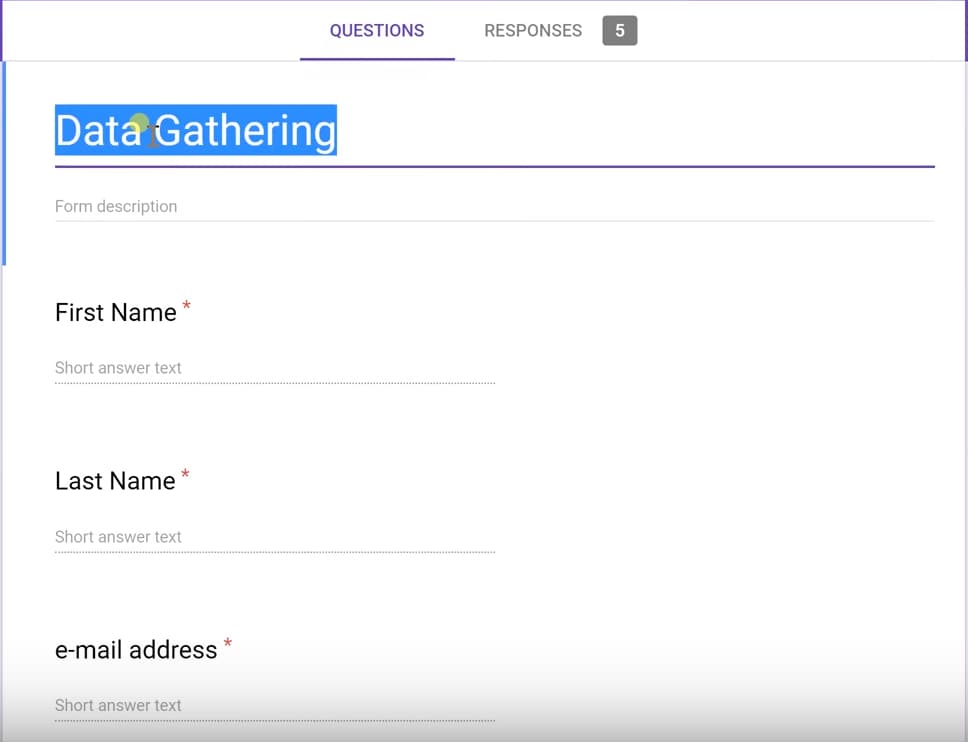
For our example, we will be taking the names, emails, and other information from the recipient.

Question Types

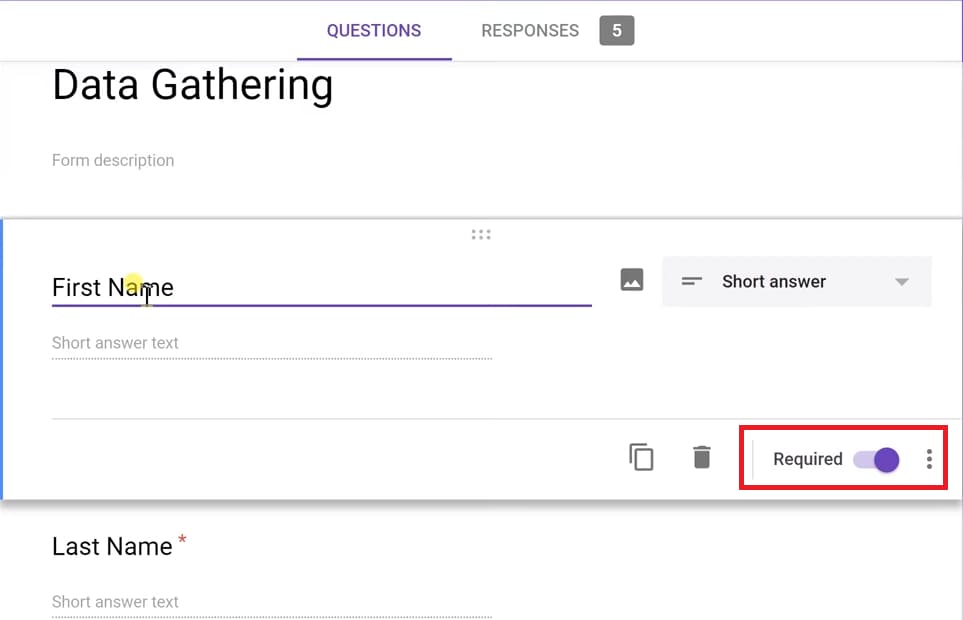
The first type of question will be Short answer – the first field, ‘First Name’, has a selection box to the right. This allows the report creator to decide how the recipient will answer the question. You may choose between various options, but most reports utilize common question types like short answer or multiple choice.

Short answer question type

The ‘First Name’ field will be left as a short answer, but we will also make it a required field. Making a field required will place a red asterisk next to the question for the recipient, and they will not be able to submit the form without answering this question. This option is toggled on the bottom right of the question box. We will do the same process with the next two fields, ‘Last Name’ and ‘Email Address.’

Name fields

To ensure the recipients enter valid dates, we will choose the “Date” option in the question type selection box. This ensures that the data we receive from the form recipients will be uniform and in a valid format. The specific date format (whether month/day/year, day/month/year, or other variation) can be modified as well.

date field question type

We will use the multiple-choice option for questions with a specific answer out of a list. This will create the “What time should we contact you?” field, allowing recipients to answer with three options. The number of choices can be added with the “Add Option” button or subtracted with the “X” button on the right side.

Multiple choice question type

Additionally, multiple-choice questions can have multiple answers. The “Do you own a car?” field will use a check-mark multiple-choice option, which allows users to select as many options as are applicable.

Check mark

Sending the Form

With a paid G Suite account, you have the option of clicking a box at the top of the “Send Form” window to automatically collect email addresses within your organization. Otherwise, there are multiple ways to send the form to recipients.

If you contact me here or email me at po@prolificoaktree.com, you will receive a code for 20% off of your first year of G-Suite. If you sign up for G Suite using this link and apply the code during checkout, the discount will be applied.

Option to collect email addresses

You can email a notice to your list about the form. This notifies the users about the form itself, and you can also choose to include the form itself inside the email so that recipients can immediately fill it out upon receiving the notice.

Include the form in the email

Google Forms can also produce a link you can send via various forms. This gives your users a clickable option that doesn’t use their email (for sending through text messages, for instance).

Send form as link

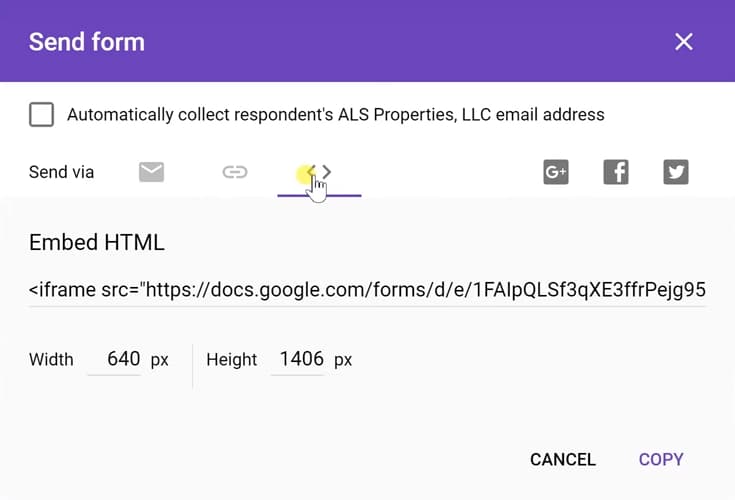
Lastly, you can embed the form as HTML directly into your website. This option keeps the form on your webpage so your users don’t have to leave.

embed the form in html

Analyzing the Data

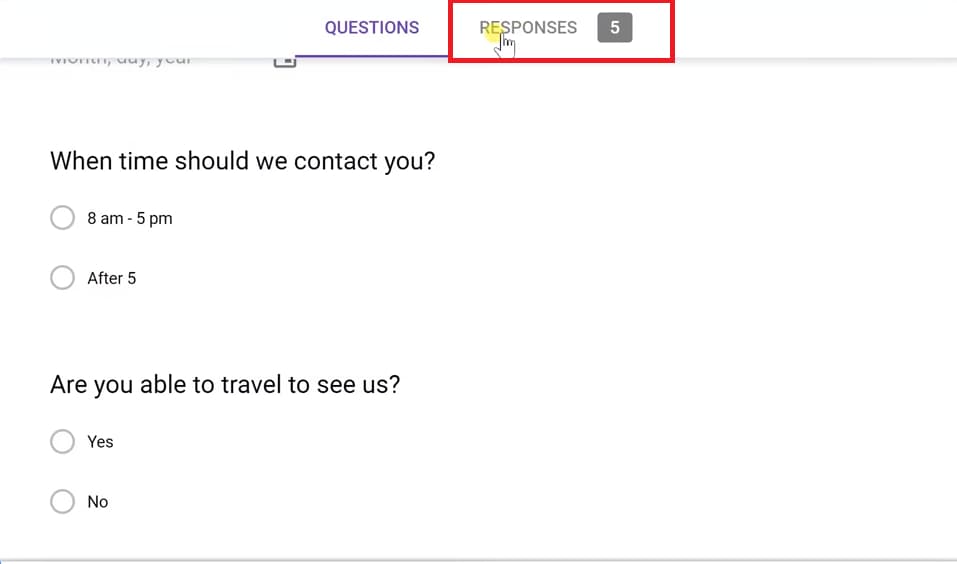
To analyze the responses received, return to the form’s main page and click the “Responses” tab next to the “Questions” tab. This allows you to graph the data received from the form.

See responses to form

The database, which holds all the raw data you have received, is visible on the upper right side of this menu.

Option to review responses in Sheets

Now that you have the data in Google Sheets, you can manually sort and analyze everything at a glance!

View entries in Sheets

Google Sheets – Insert Sheet Names into Cells

See the linked video to learn how to insert the sheet names into cells in Google Sheets. This page is the for the text that accompanies the YouTube video.


The code for the regular expression is =IF(TODAY()=TODAY(), REGEXREPLACE(CELL("address",'Detail 1'!A1),"'?([^']+)'?!.*","$1"), ""). The text in the box below is meant to be copy and pasted for the custom functions that were used in this sheet. The text in this Doc is the same, grab it from here if it’s easier.

//Return the current sheet name.
function SheetName() {
return SpreadsheetApp.getActiveSpreadsheet().getActiveSheet().getName();
}

//Return all current sheet names.
function SheetNames() {
var out = new Array()
var sheets = SpreadsheetApp.getActiveSpreadsheet().getSheets();
for (var i=0 ; i<sheets.length ; i++) out.push( [ sheets[i].getName() ] )
return out
}

//Return specified sheet name
function SheetNumber(idx) {
if (!idx)
return SpreadsheetApp.getActiveSpreadsheet().getActiveSheet().getName();
else {
var sheets = SpreadsheetApp.getActiveSpreadsheet().getSheets();
var idx = parseInt(idx);
if (isNaN(idx) || idx < 1 || sheets.length < idx)

return sheets[idx-1].getName();
}
}

Drive home page showing link to Admin page

G Suite vs. Free Google Apps | What is the difference?

If you’re a company or organization using the free Google Apps, and you’re looking for something that gives you more control over the way that your users utilize them as well as some great additional features, G Suite might be just what you need. Let’s take a quick look at Google’s premium option and what it can offer for you and your organization compared to the free standard version.

If you email me at po@prolificoaktree.com you will receive a code for 20% off of your first year of G-Suite. If you sign up for G Suite using this link and apply the code during checkout, the discount will be applied after your trial period expires.

Admin Console

The Admin Console, which is an addition to your usual Google Apps menu, contains a lot of features that give you control over your users and how they access and share data and use the Google Apps within your organization.

Drive home page showing link to Admin page

If you click on the Admin app, you’ll be presented with a number of useful features. On the left, the Users feature allows you to add or remove users in your organization, as well as assign them to groups, for example when scheduling different meetings on your Calendar.

G Suite admin console with Users selected

The Apps feature gives you control over which apps your users can use and see. For example, you can turn off Gmail if you’d like everything done through Outlook.

G Suite admin console with Apps option selected

The Device Management feature gives you control over access through different devices, for example, if you’d like to prevent access to company data from a phone. We’ll take a closer look at that in the Mobile Device Management section below.

G Suite admin console with Device management option selected

Video explanation

Custom Email

Perhaps the most important difference between the free Google Apps and G Suite, and something which is often the sole reason why people upgrade is the ability to customize your email address. In the free version, your email always ends with ‘@gmail.com’. In G Suite, you can put your domain name in there instead. You must own the domain before you can use it in your email address.

Gmail showing a custom email

Data Migration

Another useful feature offered in G-Suite is the ability to migrate data from a different email service, such as Outlook or an IMAP service such as Yahoo, to your Gmail account. You can migrate emails, contacts and calendar data.

G Suite data migration

G Suite Editions

G Suite is a premium service, and you can pay monthly or annually. The annual plan has a small discount, but a flexible plan may be better for you if you’re adding and removing users regularly.

G Suite Plan types

The monthly payment depends on which Edition of G Suite you use: Basic is $5/month, Business is $10/month, and Enterprise is $25/month. In most cases, if you’re a small organization, Basic will do just fine.

Comparison of flexible plan and annual plan

If we look at a comparison of the different G Suite Editions, there are a few differences to take note of. One of the main limitations on Basic is the 30GB file storage limit per user. In the Business edition, storage is unlimited, with the caveat that if you have fewer than 5 people in your organization they cannot have more than a 1TB of storage each. In Enterprise, storage is completely unlimited.

Comparison of G Suite plans with storage highlighted

The Business and Enterprise Editions offer a couple of unique features. When you move up to Business, you get eDiscovery which can be useful if you’re searching for documents for a legal case. Enterprise offers much more granular control and customization of your Gmail. None of the G Suite Editions feature ads.

Comparison of G Suite plans with enterprise features highlighted

24/7 Support

G Suite offers 24/7 support, which can come in useful if you’re doing complex tasks with Google apps in a company.

New Calendar Features

If you have G Suite and you left-click on your calendar to create an event, there are a couple more options. The first one is the option to put in an Out of Office notification. The second one is Appointment Slots which allows other people to go into your calendar and set up appointments in the time slots you have designated to be available.

Extra options on calendar frin having G Suite

In the following image, you’ll see the public-facing side of your calendar, as it appears to someone who has come in to make an appointment.

Google Calendar showing appointment slots

Google Docs Sharing Options

If you have G Suite and you go to Google Docs to create a new Google Document, and click Change in the Sharing Settings, you’ll find a range of new sharing options that give you more control over how information is shared within your organization and who can see the document contents.

Google Docs link sharing options

Mobile Device Management

Another feature of G Suite is Mobile Device Management, which gives you control over if and when to activate your user’s mobile device, as well as the option to perform a remote wipe.

G Suite admin device management options

Additional Security Features

In G Suite’s Admin Console, there’s a Security feature that gives you a greater range of security options for your organization.

G Suite admin console with Security highlighted

Inside, you’ll find options for password monitoring, login challenges, and Single Sign-On (SSO) for your users. The following image shows the options available in the Basic edition, but you will find much more granular security options in Business and Enterprise.

G Suite security options

Conclusion

That’s a brief overview of the key differences between the free Google Apps and G Suite, Google’s premium apps service. You will now have a better idea of the benefits to you and your organization if you go ahead and choose G Suite. Hope this has been helpful to you!

G-Suite Discount Code Request

After conditional formatting

Google Sheets | Conditional Formatting an Entire Row

Highlighting Just One Cell

Right now, our custom formula that we built in the previous post is =B1="Joan" and we were applying that formula to column A by using A2:A for the range.

After conditional formatting
Before formatting the entire row
Custom formula
Custom formula

However, we want to highlight each row, in its entirety instead of just one cell as is shown in this linked Google Sheet.

If you want to learn more about the complex subject of conditional formatting, I have created a course about it over at Datacamp. This is an affiliate link and if you use it to make a purchase I will receive a portion of the proceeds. Thank you for supporting my channel!

Only one cell
Only part of row highlighted

Expanding the Selection

Now, we are going to expand the range used in the “Apply to range” box all the way to column G by entering A2:G into the Apply to range input box. Specifying the range using this syntax will start the range at A2 and expand it down to the end of the spreadsheet and to the right through column G.

New range
Extending the range

Video explanation

Fixing the Formula

If you stop now, it doesn’t change anything. You would think the formatting would extend across the entire row, but it doesn’t. What you need to do is change the formula.

Custom formula with fixed column

Custom formula with fixed column

Before this change, the formula was incrementing one cell to right each time it calculated, just like any other spreadsheet formula when it is copied to another cell. Now, we have changed the formula from =B1="Joan" to =$B1="Joan". The dollar sign prevents the formula from moving to the right each time it decides if the conditional formatting criteria is being met. You have told your formula to continue looking at the same column for the criteria as it formats each cell. Just like you would if you were inside a spreadsheet cell, you used a dollar sign to indicate that value shouldn’t move when the formula moves.

The Entire Row is Highlighted

It’s working now since we fixed the column reference. Every row that was a sale by Joan has been highlighted.

Entire Rows are Highligthed
Custom formula with fixed column

I hope that was helpful. You can take this into your next presentation and wow everyone. You’ll just be amazing;) Have fun with it.

 Live examples in Sheets

Go to this spreadsheet for examples of conditional formatting that you can study and use anywhere you would like.
keep in gmail

Add an Email from Gmail into Google Keep – No Extensions

If you have a Gmail email and like to take notes in Google Keep, there have probably been times where you would like to add an email to Google Keep so that you can refer to it later. There’s a way to do this now without extensions or plugins, in just a few easy steps.

First, go to your Gmail and find the email that you’d like to store in Google Keep, and open it. On the far right-hand side of the screen you’ll find a panel with a Google Keep icon. Left-click on this icon to open Google Keep.

keep in gmail

With Google Keep open, you’ll find on the far right at the top there’s a button with a yellow plus sign which gives you the option to create a new note. Left-click on this button to create a new note for the email.

take note in keep

This brings up a window where we can add a title and text to the note. You’ll see that the note already contains a link to the email.

email link note

Add a description to the note, in this example we’ll clarify that it’s an email about time management software. Then click ‘Done’ to add the note to Google Keep.

keep note description


Now, let’s go to Google Keep. Our note is here!

note in keep

We might want to color all our Gmail notes the same color to make them easier to spot. Click the Color palette icon at the bottom of the note and select a color for this note. We’ll make it red.

keep note color

We can click on the link inside the note to bring up the email in Gmail.

keep note link email

It’s important to remember not to delete the email, as our note does not make a copy of anything – it just acts as a link-back to the original email. However, you can archive the email in Gmail to get it out of your inbox, and the link will still work fine.

gmail archive email

You can also have Google Keep remind you about the email later, for example next week. Left-click the Reminder icon at the bottom of the note in Google Keep, and select when you would like to be reminded.

keep note reminder

You can then archive the note in Google Keep as well so it doesn’t clutter the page, and you’ll still get a reminder notification, so you can deal with it at the right time. To do this, left-click the Archive icon at the bottom of the note.

archive note keep

That’s it! We’ve added our email to Google Keep. The email is archived (out of our Gmail inbox), the Google Keep note is archived (out of our Google Keep home page) and we’ll be getting a reminder about the email next week.

Hope this tutorial has been useful for you and your business!

Tutorial Video